Tag Archives: Bambusa Textilis Gracilis

How to successfully propagate Gracilis Bamboo from cuttings

How to successfully propagate Gracilis Bamboo from cuttings you ask me?

Well, it’s been a long and winding road, full of potholes of despair… but after more than 4 years, I can finally say I have learnt how to successfully propagate Gracilis Bamboo from cuttings.

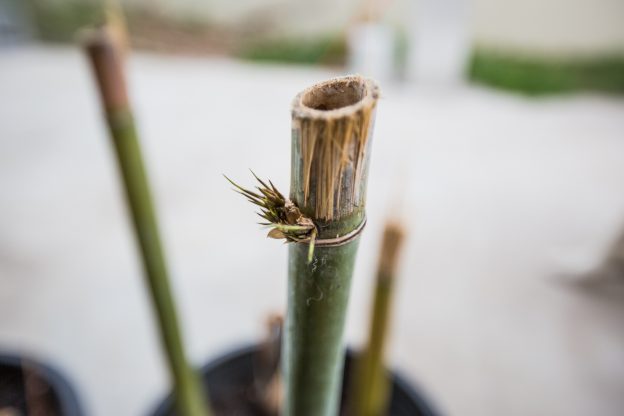
Here is the proof – this is a cutting that I successfully managed to root at the end of 2014, early 2015. See the roots coming out of the bud?

IMG_6804-2

I have since managed to successfully propagate 8 out of 8 cuttings this year. Once  you know the trick, it is quite easy to grow your own cuttings of Bambusa Textilis Gracilis.

The two diagrams below show in detail 1) When to take a Gracilis cutting and 2) How to plant the Gracilis cutting.

When to take Bambusa Gracilis cuttings?

When to take Bambusa Gracilis cuttings?

how-to-plant-bambusa-gracilis-cutting

  1. Make sure you take a cutting from a mature culm, one that is over 12 months old.
  2. The culm diameter is important in the sense that it will hold water to feed the new cutting while it attempts to grow roots to survive. Use a culm where the inner diameter (the hollow part of the tube) is greater than say 7mm, so it can hold plenty of water.
  3. Take the cutting 3 to 4 inches above and below the culm node.
  4. Make sure there is one main branch coming out of the node and the size of the “bud” is large and looks healthy as this is the point where the roots will grow from.
  5. Take the cutting around the full moon phase. The moon affects the earth in many ways. In Bamboo, the moon’s gravitational pull draws sugars and starches from the roots and rhyzomes up the culm to help new leaf growth. These nutrients provide energy for the generation of leaves and fresh branches at the node of the cutting.
  6. Remove all small branches and leaves from the node – but leave the main nodal branch as this will be the cutting”s lifeline once it grows leaves.
  7. Plant the culm in a large pot with potting mix (large pot is good to avoid disturbing young plants during transfer).
  8. Use root hormone on the bud.
  9. Place the culm almost parallel to the ground (approximately 20 to 30 degrees to the ground) and ensure the main branch sticks up out of the soil, but the bud is well placed under the soil.
  10. Place the pot in a shady spot. I placed some pots at the base of the parent plant so its “new” environment hadn’t been changed.
  11. Water the pot on a daily basis for 4 weeks.
  12. Make sure the inside of the culm is full of water at all times.
  13. This process should completed during the warmer months to give your bamboo the best chance of growth.
  14. All that bamboo wants to do is survive and grow, this will best be achieved when there is high humidity and warmer temperatures.

One of the keywords that constantly keeps popping up in my statistics is “Gracilis Growth Rate”.

I would also like to crush any and all myths about this and set some facts straight.

  1. When planted from a cutting, Gracilis will do pretty much nothing the first 12 months. It will be sorry looking stick in the ground growing roots and a few small branches and leaves.
  2. The following 12 months, it will send some new small culms up – these will be the diameter of a pencil (maybe even smaller). The culms will grow to a height of approximately 2 metre or so and still look a bit sorry.
  3. After the first 24 months, things become interesting, and gracilis now throws some culms up to approximately 3 metres in height – but this depends on factors such as the size of the container, how much fertiliser/nutrients have been provided and how much water has been provided.
  4. Now you have a thick and dense Gracilis grove… the next year, you will see new culms that may reach the maximum height. The lower half of the plant will start to defoliate as the upper half grows most, if not all of the leaves.
  5. Gracilis is great for “all-round” privacy the first couple of years, but once it has matured, leaves only appear on the upper half of the culms. So it is great to block out a two storey window, but not ground levels.

Anywho, that’s all from me for now, follow these guidelines, good luck and let me know how you went!

I look forward to hearing from you :)

Henry Gomez aka Papa Gomez.

Propagating Gracilis Bamboo by Division – 102

Propagating Gracilis Bamboo by Division – 102

Propagating Gracilis bamboo by division is much, much easier than from cuttings. I’ve had mixed results with bamboo propagation via cuttings, but one thing is for sure, the technique outlined below is fool-proof.

Here are a few guidelines that have worked for me that I’d like to share with you.

1) Larger bamboo culms do not work as well as smaller ones. I use Gracilis culms that have the diameter of a pencil.
2) Make sure the culm has a few nodes (3 or more is good).
3) When you dig up the culms, make sure the rhyzome and roots are still attached.
4) In the photos below, I have two culms and a new shoot growing off the rhyzome.
5) Keep the rhyzome wet and work quickly. Don’t leave it out in the sun to dry out.
6) Cut the culm where it is attached to the parent rhyzome, but make sure it has roots attached!
7)  Water new plant in and keep the soil damp (but not water logged)

Progpagating Gracilis bamboo by division is quite straight forward and easy, Just be careful and gentle with the fragile young culms.

I’ll update this post with more photos as the new culms grow. These were taken on the weekend of the 25th of January 2015.

Propagating Gracilis Bamboo – 101

Dear reader, if you are after detailed instructions on how to successfully propagate Gracilis bamboo from cuttings, this is the link you are after: How to successfully propagate Gracilis bamboo from cuttings as I have managed to grow new Gracilis from cuttings after numerous trials. The instructions in this page were not that good and the rate of success was none.

I have finally managed to successfully propagate my very own Bambusa Textilis var. Gracilis! I obtained some culms from a friend and I now have some leaves that have started to bud and very tiny root systems.

It is only fair that I share my findings, but I have to give a lot of credit to Shawn Gilbert who was absolutely instrumental in providing the key points to a successful propagation.

I have currently got a 40% success rate – but this was my first attempt using Shawn’s technique and I have to confirm it works! I am still a little unsure about the exact science as this bamboo has proven to be a difficult plant to propagate. I should also say I didn’t use root hormone (I was too busy cutting the bamboo like mad)

Here are the important points to note:

  • When you first cut the culms, put them in a bucket full of some type of richgrow liquid formula. I used “Seasol” diluted in water and soaked the culms for 2 to 3 hours (it is a seaweed fertiliser rich in nitrogen – grass loves nitrogen)
  • You must use old culms, the older the better
  • Try to find culms with a diameter larger than 1″
  • I found culms with large buttons at the nodes had a better success rate than nodes with no buttons (this is for the 2 node cuttings)
  • Water the culms every day (ensure that you fill the culm with water) for the first month and a half
  • Pick the right time… I planted my culms in the middle of May (Southern Hemisphere = winter)

I have searched the internet for bamboo propagation via culm cuttings and identified two types of cuts that can be used. One cut has 2 nodes, and the other cut only has 1 node and all of the branches coming out of the node have been cut back – all except for the main one (as per Shawn’s website).
It took 2 weeks for the first leaves to appear, but at the 1 month mark, tiny branches were popping out of the buttons at the nodes .

Single node cutting - new leaf is sprouting

Single node cutting – new leaf is sprouting (1 month mark)

Two nodes cutting

Two node cuttings – 1 month mark

Single branch at a single node

Single branch at a single node cutting – 1 month mark

More  branches popping out

More branches popping out

Small button at a node - ready to pop out

Small button at a node – ready to pop out (2 months mark)

Single node cutting with one branch. See the new leaf?

Single node cutting with one branch. See the new leaf?

Double node with branches appearing

Double node with branches appearing – 2 month mark

More double node cuttings

More double node cuttings

Few bamboo cuttings in one pot

Few bamboo cuttings in one pot

I also noticed the culms that stayed green after the 1.5 month mark would be successful as they had leaves pop out soon after.

We are now getting to the 2 month mark and I pulled one of the culms out to see if it had roots. The photos below show a thin, long and stringy roots.

Single node bamboo - no roots at the branch

Notice how the culm is still green even after 2 months in the ground?

Bud appearing at the on the single branch

Bud appearing on the single branch – note: there are no roots at single node.

I am going to leave the culms in the pots a couple of months longer and wait for spring to swing by.

Update: 19th May 2016 – these cuttings all dried and died after months of watering.

But this page: How to successfully propagate Gracilis bamboo from cuttings has instructions that actually worked!